
Midi blocks
Create a midi block
A midi block holds notes played by a virtual instrument: drum instruments, or a synthesiser sound. A midi block lives on an ordinary track, alongside any recordings.
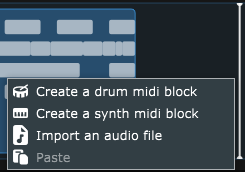
Right click empty space on any track, then choose Create a drum midi block or Create a synth midi block. While the menu is open, a small vertical bar shows the beat the block will be placed on.
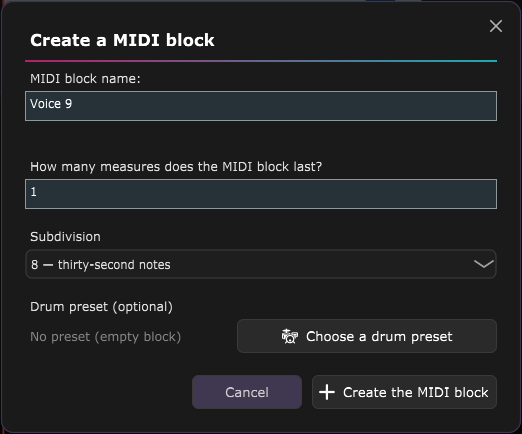
- Give the block a name.
- Set a number of measures (1 to 128).
- Choose a subdivision: how fine the note grid is, from 1 (whole beat) to 16 (sixty-fourth notes) per beat, with triplets, quintuplets and sextuplets too. You can change it later.
- For a drum block, the Choose a drum preset button is optional: without a preset, the block starts empty, and you add the instruments afterwards. For a synth block, the Choose a synth sound button is required: the block can only be created once a sound is chosen.
These buttons open the sound library, where you can browse and listen before choosing, then return to the block creation. See the Sound library chapter. The block is mono or stereo according to the track's channel setting. Once created, its editor opens right away.
The block editor
Double click a block, or right click then "Edit the block", to open the editor. It fills the whole window, in place of the multitrack view, and closes with the "Back to the multitrack" button.
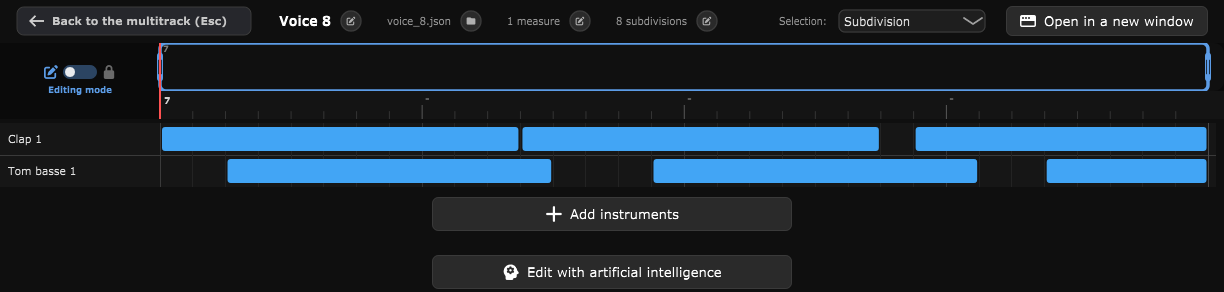
For a drum block, the matrix has one row per instrument. For a synth block, it shows an 88-key keyboard. In both cases:
- Click an empty cell to add a note (you hear it as you add it); a single click on an existing note removes it.
- Drag the body of a note left or right to move it in time: it snaps to the subdivisions, cannot start before the block's beginning or end past its end, and cannot overlap another note.
- Drag a note's right edge to change its length.
- The Edit with artificial intelligence button opens the AI part generation. See the matching chapter.
The bottom bar plays the block on its own, with its own volume, effects and an equaliser. On the right, as on the multitrack, are the metronome button and a reminder of the tempo and time signature (the metronome preference is shared with the multitrack's). For an audio block, the timeline ruler, the overview bar, the grid under the waveform and the metronome follow the session's real tempo and time signature over the block's span: an accelerando or a time-signature change inside the block is visible, and the tempo/time-signature readout scrolls during playback. For a MIDI block it is a single constant tempo (its notes play at that tempo anyway, and its note matrix is a fixed grid). During playback, a vertical line shows the position within the block, on the note matrix as well as on an audio block's waveform; the "stop" button brings it back to the start of the block. Every change you make can be undone (see the History chapter).
Select and rework notes
In the top left corner of the editor, a switch toggles between Editing mode (the default) and Locked mode. The choice is remembered for the block.
- In editing mode, a click on the matrix adds, removes or resizes a note, as described above.
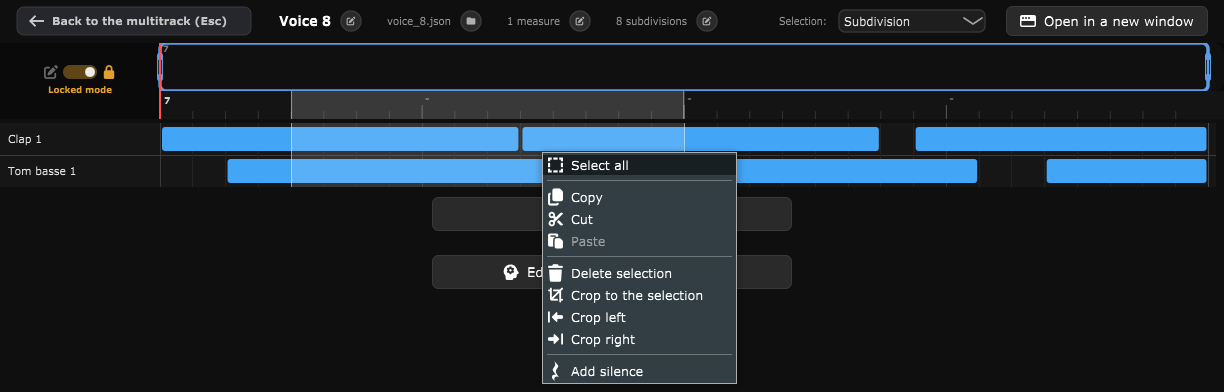
- In locked mode, the matrix can no longer be changed by mistake: it behaves like an audio block's waveform. A click moves the time bar, and a drag draws a time selection.
In both modes, you can also draw the selection on the time ruler above the matrix: it is mirrored there as a band. A "Selection" selector chooses between Subdivision (the default: the selection snaps to the block's subdivision) and Time (it snaps to beats, easier to read on a grid). The choice is remembered.
A right click on the matrix or on the time ruler opens a menu: Select all, Copy, Cut, Paste, Delete the selection, Crop to the selection, Crop left, Crop right and Add silence. The Ctrl + A / C / X / V shortcuts work, and the Delete key deletes the selection.
- Cut, paste and add silence shift the rest of the block, as in the waveform editor; deleting the selection closes the gap the same way, without touching the clipboard.
- The note clipboard is shared by every editor window: you can copy in one block and paste in another, even in a separate window.
- An operation that would make the block run into the next block of the track is refused.
Change the subdivision
The block's subdivision is shown in its header. A click on the subdivision button opens the Change the block's subdivision window, which offers the nine values (1, 2, 3, 4, 5, 6, 8, 12 or 16 per beat). On confirming, the existing notes are put back on the new grid, as close as possible to their original position. The change can be undone.
A drum block's instruments
A drum block is no longer tied to a kit, but to individual instruments. In its editor:
- Add instruments opens the library, where each click on "Add this instrument" adds a row to the block.
- A right click on an instrument row offers Duplicate instrument and Delete instrument.
- Save this drum preset turns the block's instruments into a reusable preset, as long as they don't already form a preset.
Duplicate, clone, unlink, merge
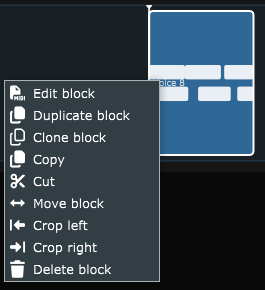
Right clicking a block offers several ways to copy it. They apply the same way to midi blocks and to audio blocks.
- Duplicate the block: creates an independent copy, with its own name. You can then edit it without touching the original.
- Clone the block: creates a copy linked to the original. The name, volume, effects and content stay identical across all instances: editing one edits the others.
- Unlink block (shown on a cloned block): turns it into a block of its own, with its own file and its own name. Its position does not change, and the other clones keep sharing the original. On a selection of several blocks, each one is given a name automatically.
The new copy is placed right after the end of the source block. To join several blocks of the same track into one, select them then use Merge the blocks. The blocks no longer need to be butted up: a gap between them becomes silence in the merged block. For midi blocks, that gap must be a whole number of beats, otherwise a message says so; and the merge is refused if another block sits between the ones to merge.
Copy, cut and paste blocks
One or several blocks, audio or midi, can be copied and pasted from the multitrack view.
- Select the blocks (click, Shift + click), then right click: Copy or Cut. Ctrl + C and Ctrl + X do the same.
- A right click on empty space on a track offers Paste, at the beat closest to the click (a small vertical bar shows it before you choose). Ctrl + V pastes at the time bar's position.
Pasting clones the blocks: they share the original's file, name and mix (use Unlink to separate them). The spacing between the copied blocks is kept, and each one goes back to the track it came from, even if you copied them from several tracks. If a pasted block would overlap another, nothing is pasted and a message says so.
Move a block
To change a block's position on the timeline, right click it then choose Move the block. This works for a MIDI block as well as an audio block.
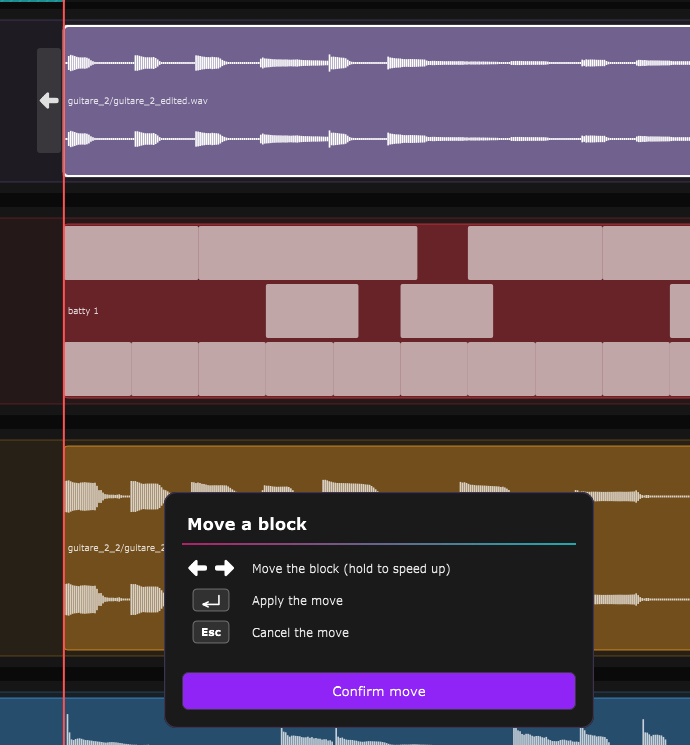
The block is then outlined, with an arrow at each of its ends, and a floating Move a block panel recalls the controls. That panel does not block the rest of the window: you can drag it anywhere by holding it with a left click (it stays where you release it).
- The keyboard ← and → arrows, or the arrows at the block's ends, nudge the block step by step. Hold the key or the button to speed the move up.
- Enter, or the Confirm move button, applies the new position.
- Esc cancels and puts the block back where it started.
A block can never overlap another one on the same track: if it runs into a neighbour, it stops there. It can, however, go back before measure 1, into measure 0 (the hatched area that precedes the first measure); the limit is reached when the block's start touches the beginning of measure 0. This holds both for this fine move and for moving a block directly with the mouse on the multitrack (held left click), which additionally snaps the block to the beats.
Several blocks at once: select them, then drag one of them (the whole group follows, snapped to the beats), or choose Move blocks in the right click menu: every selected block shows its arrows, and the group moves in one go. If any block would overlap another, the whole move is blocked. It is undone in a single step.
Crop a block from the multitrack view
A right click on a block offers Crop left and Crop right (midi and audio), at the beat closest to the click, which the small vertical bar shows in advance.
- Crop left discards everything before that point: the block now starts there.
- Crop right discards everything after it: the block ends just before that point, so a following block can start exactly on that beat and stay mergeable.
Cropping can be undone, and the original file is kept (see the Disk space chapter).
ASIO is a trademark of Steinberg Media Technologies GmbH, registered in Europe and other countries.